How to Clean a Mechanical Keyboard: Complete Guide
Published: 30 Apr 2026
If you spend hours typing, gaming, or working from home, a dirty keyboard can slow you down and even affect your health. Knowing how to clean a mechanical keyboard is essential to keep your setup functional, comfortable, and hygienic. Dust, crumbs, oils, and accidental spills can make keys sticky, reduce responsiveness, and create a breeding ground for germs.
In this guide, you’ll learn step-by-step methods for both daily maintenance and deep cleaning. We’ll cover how to clean keycaps, switches, and hard-to-reach areas. You’ll also discover tips for handling sticky keys, spills, and different types of keyboards.
By the end, you’ll have a clean, responsive, and long-lasting keyboard that enhances your typing comfort and gaming performance. Keep reading to transform your keyboard into a spotless, reliable workspace essential for work, play, and productivity.
1. Why Regular Keyboard Cleaning is Important
Regular cleaning keeps your keyboard functioning smoothly and extends its life. Dust, oils, and food particles accumulate over time, making keys less responsive and potentially spreading germs. A clean keyboard ensures comfortable typing, prevents sticky keys, and maintains overall performance. This is particularly important for people working from home, gamers, or those in shared workspaces. Establishing a routine for cleaning keeps your keyboard reliable and pleasant to use.
2. Tools and Materials for Cleaning Mechanical Keyboards
2.1 Essential Cleaning Tools
To clean your keyboard safely and efficiently, gather these tools:
- Microfiber or soft lint-free cloth
- Keycap puller or small flat tool
- Compressed air canister
- Keyboard cleaning gel or putty
- Small brush or toothbrush
- Mild dish soap or gentle cleaning solution
2.2 Tips for Using Cleaning Materials
- Avoid harsh chemicals that can damage keys or switches
- Keep keycaps organized to make reassembly easier
- Use minimal moisture to protect electronics
3. How to Clean a Mechanical Keyboard?
Cleaning a mechanical keyboard properly ensures longevity, smooth key presses, and a hygienic workspace. This step-by-step guide covers everything from unplugging the keyboard to deep cleaning keycaps and the board.
3.1 Unplug Your Keyboard
Always disconnect your keyboard from your computer or remove batteries from wireless models before starting. This prevents accidental key presses and protects the electronics from potential short circuits or water damage. Even if you are just doing a light surface cleaning, unplugging is a safe practice.
3.2 Take a Picture of Your Mechanical Keyboard
Before removing any keycaps, take a clear photo of your keyboard layout. Mechanical keyboards often have non-standard layouts, especially gaming models with additional function or macro keys. A picture ensures you can reassemble all keys correctly and avoid mistakes that could affect typing comfort.
3.3 Remove the Keys
Use a keycap puller or a small flat tool to carefully remove each keycap. Work slowly to avoid damaging the switches. Organize keycaps by row or group and place them in a container so you don’t lose or mix them. For larger keyboards, consider removing keys in small sections to stay organized.
3.4 Rinse the Keys
Place the keycaps in a bowl of warm water to remove surface dirt and debris. Lightly agitate them to loosen grime. Avoid soaking the keyboard base or allowing water to contact switches, as electronics are very sensitive to moisture.
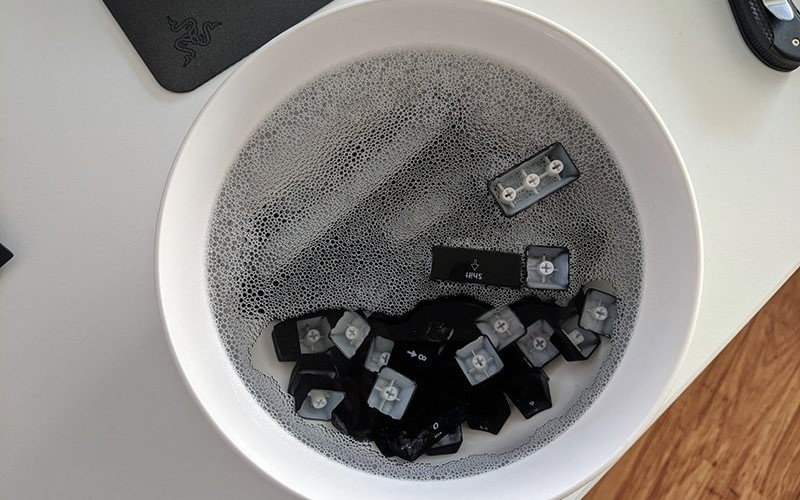
3.5 Soak the Keys
For a deeper clean, soak keycaps in a mild soap or dishwashing solution for 15–30 minutes. This helps dissolve built-up oils, grease, and stubborn grime from fingers and food. For heavily used keyboards, you may need to gently scrub keycaps after soaking.
3.6 Clean the Keys
After soaking, scrub each keycap gently with a soft brush, toothbrush, or small sponge to remove any remaining dirt. Rinse thoroughly under running water and dry completely with a lint-free cloth or air-dry on a towel. Make sure keycaps are fully dry before reattaching to avoid moisture damaging the switches.
3.7 Clean the Board
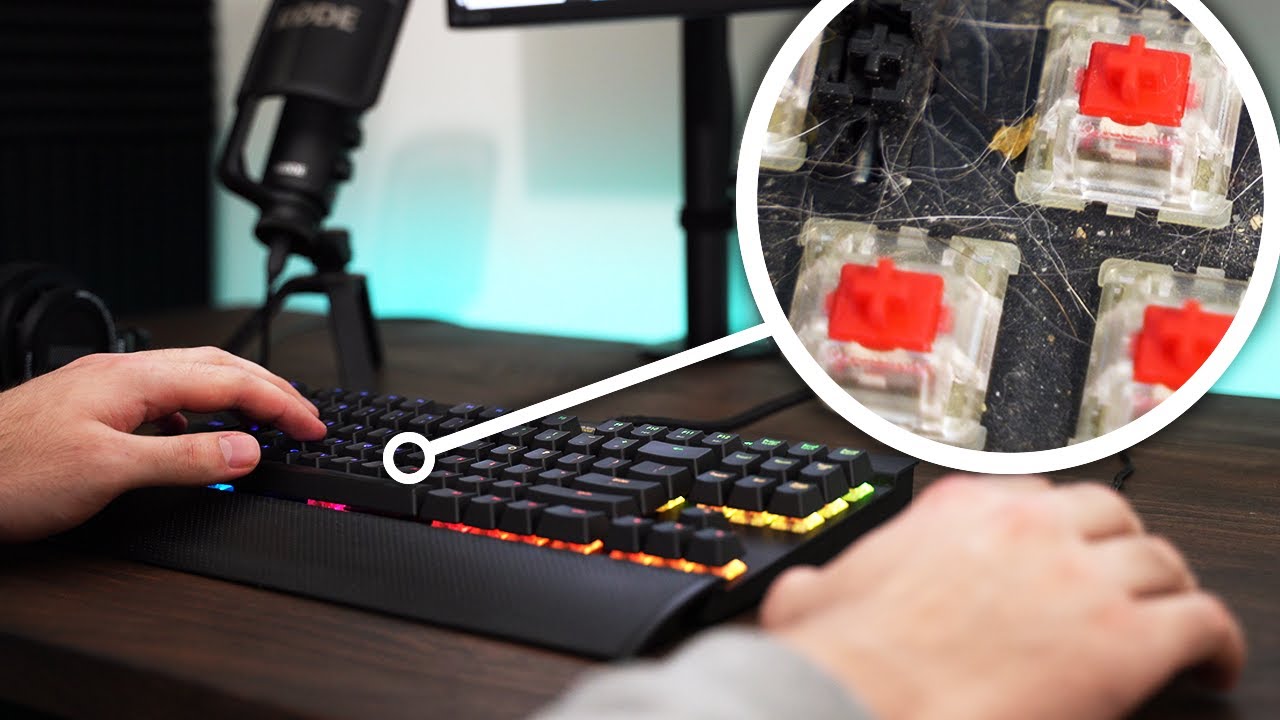
While the keycaps dry, clean the keyboard base. Use compressed air to blow out dust, crumbs, and small debris from the switch gaps and corners. For sticky or oily areas, lightly dampen a microfiber cloth with water or isopropyl alcohol and wipe the surface. Avoid pouring or spraying liquid directly on the keyboard. Pay special attention to the spaces between switches and edges where dirt tends to accumulate.
4. How to Clean Specific Keyboard Issues
4.1 How to Clean Sticky Keys?
Remove affected keys and wash them with warm, soapy water. Use compressed air to remove debris from the switches.
4.2 How to Clean Dust Out of a Keyboard?
Turn the keyboard upside down and shake gently. Use compressed air for the remaining dust.
4.3 How to Clean Between Keyboard Keys?
Use a small brush, cotton swab, or keyboard cleaning gel to reach tight spaces.
4.4 How to Clean Coffee or Liquid Spills from a Keyboard?
Unplug immediately. Remove keycaps and wipe off liquid with a dry cloth. Let the keyboard dry completely before use.
5. Cleaning Different Types of Keyboards
5.1 Cleaning a Backlit Keyboard
Avoid soaking. Use compressed air and a lightly dampened cloth. Remove keycaps separately if possible.
5.2 Cleaning a Silicone or Rubber Keyboard Cover
Wash with mild soap and water. Allow it to air dry completely before placing it back.
6. Quick Cleaning Methods for Everyday Maintenance
Even if you don’t want to do a full deep clean regularly, maintaining your keyboard with quick cleaning methods helps keep it hygienic and responsive. These techniques take just a few minutes and prevent dirt and debris from building up over time.
6.1 Shake Out Loose Debris
Turn your keyboard upside down and gently shake it to remove crumbs, dust, and small particles. You can lightly tap the back or sides to dislodge stubborn debris. This simple step is effective for everyday maintenance and prevents dirt from settling between keys. For compact or mechanical keyboards, a gentle shake works better than forcing it, which could damage the switches.
6.2 Use Compressed Air
Compressed air is ideal for blowing out dust and debris trapped between keys and in hard-to-reach areas. Hold the keyboard at an angle and use short bursts of air across the key gaps. Avoid holding the can too close to prevent moisture from the propellant. This method keeps the switches and board clean without any disassembly.
6.3 Wipe Down with a Microfiber Cloth
Lightly dampen a microfiber cloth with water or isopropyl alcohol and wipe the surface and keycaps. This removes fingerprints, oils, and surface grime that accumulate from regular use. Avoid soaking the cloth; excess liquid can seep into the keyboard and damage electronics. Regular wiping helps maintain a fresh and hygienic workspace.
6.4 Use a Keyboard Cleaning Gel
Keyboard cleaning gels or putty are designed to get into the tiny cracks and crevices between keys. Press the gel onto the keycaps and gently lift it; it picks up dust, hair, and crumbs. This method is quick, effective, and safe for regular use. It’s especially useful for keyboards with non-removable keycaps or irregular layouts.
8. Conclusion
Keeping your keyboard clean is essential for comfort, performance, and long-term durability. Dust, oils, crumbs, and spills can accumulate over time, making keys sticky, reducing responsiveness, and even creating hygiene issues. By following a regular cleaning routine, you can prevent these problems and maintain a smooth, reliable typing experience.
Daily maintenance, like shaking out debris, using compressed air, and wiping the surface, helps keep minor dirt under control. Periodic deep cleaning, including removing keycaps, washing them, and carefully cleaning the keyboard base, ensures that grime and oils don’t build up over time.
FAQs
Unplug your keyboard first. Use compressed air to remove dust and wipe the surface with a microfiber cloth. Remove keycaps and wash them with mild soap for spills or sticky keys.
Turn off or unplug the keyboard. Use compressed air or a small brush to remove debris from switches. For deeper cleaning, remove keycaps and gently wipe around the switches.
Unplug the keyboard and shake out loose debris. Use compressed air to remove dust and wipe the surface with a microfiber cloth. Remove keycaps for a deeper clean if needed.
Use a microfiber cloth slightly dampened with water or isopropyl alcohol. Wipe the keys gently without soaking them. Avoid spraying liquid directly on the keyboard.
Unplug the keyboard and remove keycaps if possible. Use compressed air to clear dust and wipe the surface. Wash keycaps occasionally for deep cleaning.
Perform light cleaning weekly with compressed air and a microfiber cloth. Deep cleaning, including keycap removal, should be done every 2–3 months. Adjust frequency based on usage.
Use a small flat tool carefully, or stick to surface cleaning with compressed air and a microfiber cloth. Avoid forcing keys to prevent damage. Keep the keyboard unplugged while cleaning.
Remove keycaps and soak them in warm, soapy water. Scrub gently with a soft brush, rinse, and dry completely. Reattach only after the keycaps are fully dry.


- Be Respectful
- Stay Relevant
- Stay Positive
- True Feedback
- Encourage Discussion
- Avoid Spamming
- No Fake News
- Don't Copy-Paste
- No Personal Attacks
- Be Respectful
- Stay Relevant
- Stay Positive
- True Feedback
- Encourage Discussion
- Avoid Spamming
- No Fake News
- Don't Copy-Paste
- No Personal Attacks
